Shareable haptic experience
Though native iOS app developers have a full framework for complex, LRA-powered haptic effects, among a host of other missing features, Safari for iOS lacks support for any haptics. As a web developer, why should I miss out on this dimension? This is exacerbated on Apple Vision Pro, where you have no surface to tap your fingers against when you use direct manipulation of virtual UI.
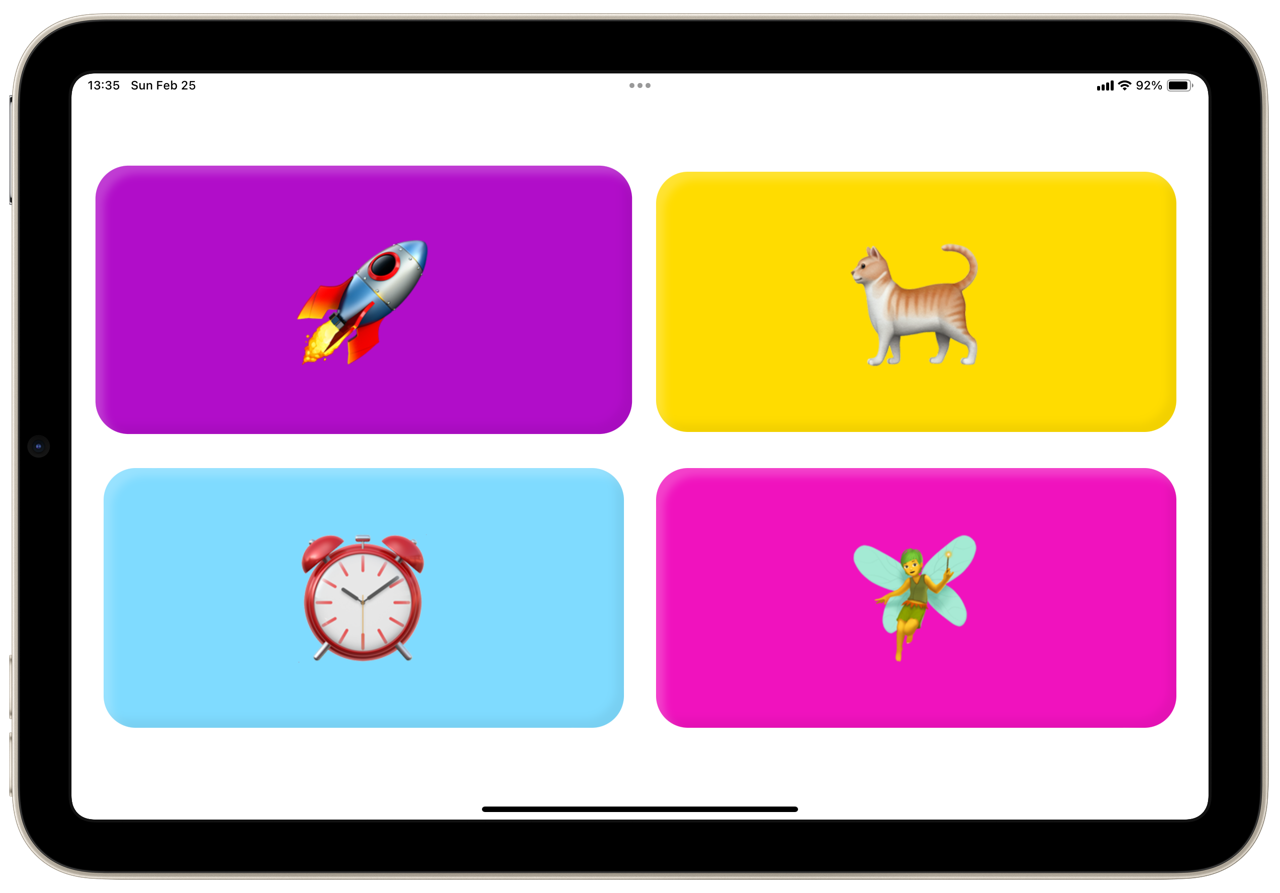
This week, I sought to bring haptics to my own website, through custom hardware, Arduino software, and over-engineering. I built a sound board for haptics, where you can experience an alarm clock, a rocket takeoff, a cat purring, or a fairy twinkling purely through touch, regardless of what device you’re browsing the web on, but it’s designed for Apple Vision Pro.
Making process
With two hours to build, I immediately devised a basic system of how the pieces would fit together:
- The website would fire events when haptics were called for
- A WebSockets server would relay the haptic code
- The Arduino would join the local Wi-Fi network and connect to the WebSockets server
- The Arduino would listen for haptic events and use its haptic motor driver with different effects pre-programmed
Starting from WebSockets
I knew I needed to get a WebSockets server running, and didn’t want to tackle using a library to do it myself. After spinning up a Next.js site with the button UI, I started with PartyKit, a new entrant in this space. While setup & code implementation was super quick, after I deployed once, further changes claimed to be deployed but the site never updated in production. While I’m still curious about the platform, I gave up on it with my limited time.
I looked back at a project I made last week which used Liveblocks. Though their API documentation demonstrates that their HTTP API supports some basic GET/POST actions but not subscribing to events, I opened up my browser DevTools on my project. Sure enough, they’re using a standard WebSockets URL like any other realtime provider, and it didn’t require authentication or complexity to join without using their client libraries.
The client UI ended up simple:
import React from "react";import { RoomProvider, useBroadcastEvent } from "./liveblocks.config";function App() {const broadcast = useBroadcastEvent();return (<buttononClick={() => broadcast("rocket")}style={{ backgroundColor: "#B10DC9" }}>🚀</button>// …)}export default function WithLiveblocks() {return (<RoomProvider id="web-haptics" initialPresence={{}}><App /></RoomProvider>);}
Connecting the Arduino
It was time to get the Arduino online. I returned to an Arduino project I made last spring, copying & pasting the Wi-Fi connection code out of there. After getting the password to the sandbox Wi-Fi network, I got my Arduino online.
I spent half an hour fighting to get WebSockets running on the Arduino, spelunking long-unmaintained libraries. It’s always a difficult balance discerning when to ask for help vs pushing through yourself, but I figured one tip or link could make the project happen far sooner. I asked an ITP friend, who recommended checking out Tom Igoe’s name on the topic. His example code was straightforward to implement and worked perfectly.
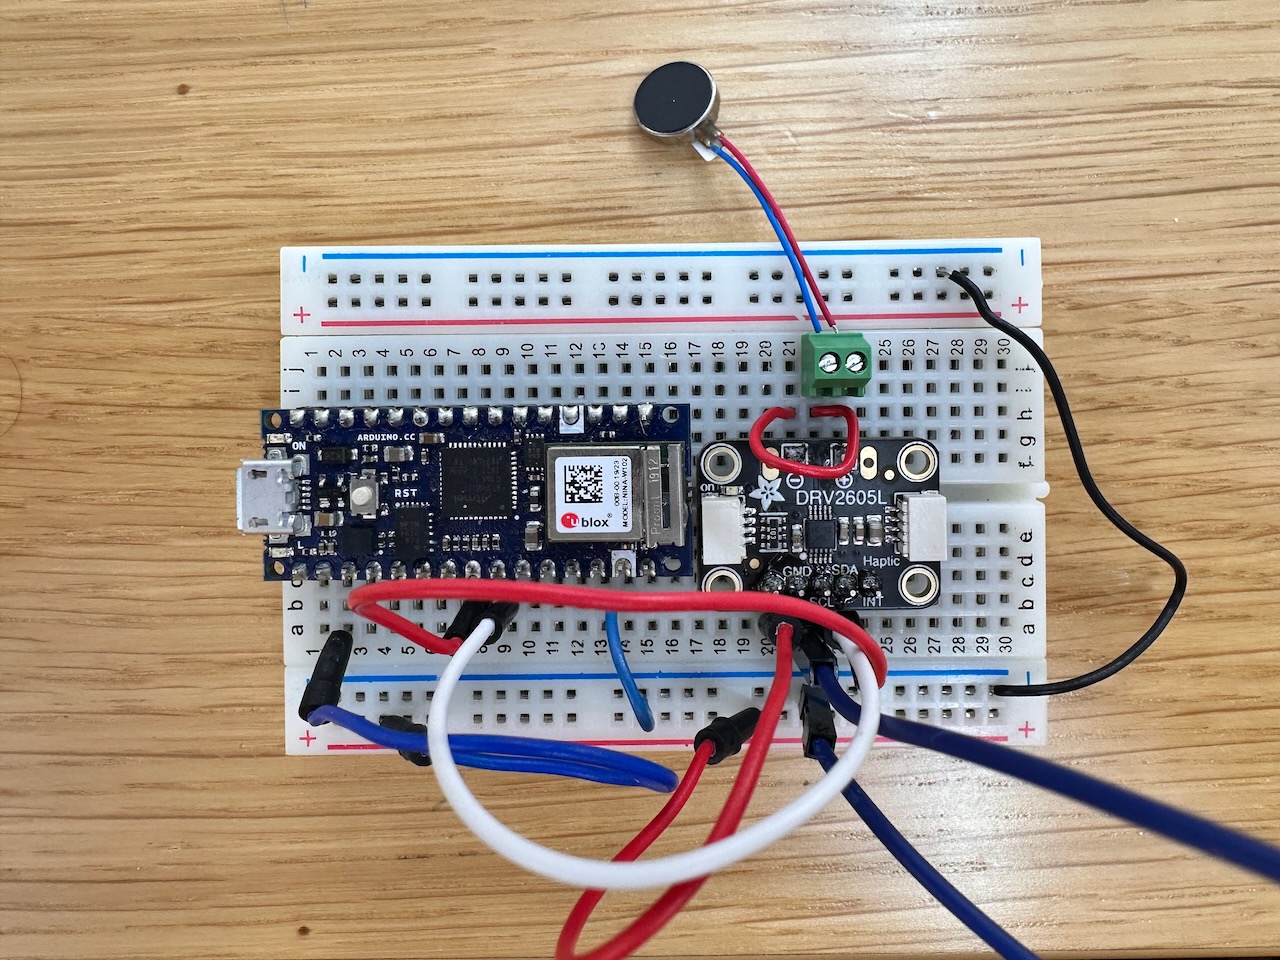
Hardware time
With twenty minutes remaining, I needed to get the hardware ready in a hurry. I pulled out my latest experiments from my breadboard to re-implement my haptic motor driver project wire for wire.
I super wanted to turn the circuit board into a wearable, but I just didn’t have the time, as I needed to program the different effects into the Arduino before demo time.
Seeing my classmates’ projects, I focused the most on the software stack and the least on the hardware/physical fabrication of the group—a reflection of the work I gravitate to.
Designing the haptics
The effects I settled on slightly randomly, exploring the emoji picker thinking about what elicited a physical response in me. I settled on a rocket takeoff, an alarm clock, a cat purring, and a fairy, though I could easily add more for a phone ringing, a butterfly flying, etc.
Using the Adafruit DRV2605 library, I was initially confused by the first argument, the order in which the haptic effect you’re registering should fire. That number should be incremented with each effect you register, no matter how many you want—the 0 & 1 values the documentation demonstrates have no special meaning. My first few rounds of effect design, they all felt the same, because my litany of effects were all running at the same time. Incrementing those numbers solved this issue.
Deploying
To polish the site, I added a scale animation and plastic-styled gloss to the buttons to add push-appeal. I added a sound effect to fire on click alongside the haptic with Josh Comeau’s use-sound library.
The Next.js configuration seemed overly complex for a client-only, 4-button UI, so I took the opportunity to try vanilla Vite. Migrating all the pieces together took a surprisingly long time to get set up, but it’s now substantially less code. It’s super fast to get the codebase running thanks to Bun + Vite, and I deployed it on Vercel.
The codebase is all open source on GitHub, including the final Arduino code.